
Turn regular earbuds into noise-cancelling ones with a simple hack and a downloadable app. Save hundreds of dollars and boost your focus in minutes.
Let’s be honest, life’s loud. Distractions are everywhere, whether it’s the never-ending chatter at the coffee shop, the clattering of dishes in your kitchen, or the constant hum of traffic outside.
It’s hard to find a quiet space to think, much less concentrate on the things that matter to you. I’ve been there, struggling to hear my podcast over the sounds of the world crashing in. Noise-cancelling headphones seemed like a dream, but who wants to spend that much?
That’s why I’m here to guide you through the simple yet effective process of how to make earbuds noise cancelling to block out external noises.
You could indulge in that expensive latte or even take a weekend getaway with the money you save. So, if you’re intrigued and ready to reclaim your soundscape, let’s dive in.
Noise Cancellation Explained: The Basics
Before diving into creating or using noise-cancelling earbuds, it’s essential to grasp the underlying concept of noise cancellation. Let’s break it down:
What is Noise Cancellation?
Noise cancellation, often called active noise cancellation (ANC), is a technology designed to reduce or eliminate unwanted ambient sounds.
It uses microphones and electronic circuitry to produce sound waves that are the opposite (or “inverse”) of the external noises. When these opposing sound waves meet, they cancel each other out, reducing the perceived noise.
Key Concepts:
- Sound Waves: Sound travels in waves, which have peaks and troughs. The height of the wave is its amplitude, and the distance between waves is its frequency.
- Phase and Anti-Phase: When two sound waves are in phase, their peaks and troughs align, resulting in an amplified sound. Conversely, when they are in anti-phase, the peak of one wave aligns with the trough of another, leading to cancellation.
- Microphones and Speakers: In noise-cancelling headphones or earbuds, built-in microphones pick up external sounds. The device then processes these sounds and produces an inverse sound wave through the speakers, leading to noise cancellation.
Types of Noise Cancellation:
- Active Noise Cancellation (ANC): This method uses electronics to produce inverse sound waves. It’s most effective against constant, low-frequency noises, such as an airplane’s or air conditioner’s hum.
- Passive Noise Cancellation: This is achieved through the physical design and materials of headphones or earbuds. Thick padding or in-ear designs can block out external sounds without electronics. It’s often used with ANC for a more comprehensive noise-cancelling effect.
Limitations and Considerations:
- Not All Sounds Are Blocked: While ANC is effective against consistent background noises, it might not block out sudden, high-frequency sounds, like someone talking or a car horn.
- Battery Dependency: Active noise-cancelling devices require power to function. This means they’ll have a battery that needs charging.
- Sound Quality: Some purists argue that ANC can alter the sound quality of audio. However, advancements in technology have minimized this effect in high-quality devices.
- Awareness: It’s essential to be aware of your surroundings, especially when hearing ambient noises is crucial for safety, like walking on a busy street.
In essence, noise cancellation technology offers a way to enhance our listening experience in noisy environments.
By understanding its principles and how it works, we can better appreciate the science behind the serene soundscapes it provides.
Armed with this knowledge, you’re now better equipped to delve into the world of noise-cancelling earbuds and headphones.
How to Make Earbuds Noise Cancelling: An In-Depth Guide
Noise pollution is everywhere, from the city’s bustling streets to the hum of an air conditioner. For many, the solution to this problem is noise-cancelling earbuds.
These earbuds are designed to block out external noise, allowing you to enjoy your music or podcasts without interruptions. If you want to create your noise-cancelling earbuds, this guide will walk you through the process step by step.
1. Preparing the Foam Earplugs for Noise-Cancelling Earbuds

Creating noise-cancelling earbuds begins with the essential step of preparing foam earplugs. These earplugs are the primary component that provides the noise-cancelling effect.
Let’s delve into the preparation process to ensure clarity and ease for everyone:
Understanding Foam Earplugs:
- Foam earplugs are soft and designed to fit snugly inside the ear canal. Their primary purpose is to reduce noise exposure, making them an ideal choice for this project.
- They are crafted from memory foam, allowing them to be compressed and then return to their original shape upon release.
Steps to Prepare the Foam Earplugs:
- Choosing the Right Earplug:
- Size: Earplugs come in a variety of sizes. A standard length will fit most individuals comfortably. However, depending on the size of one’s ear canals, there might be a need to explore different sizes.
- Density: Earplugs vary in thickness. A denser foam typically offers superior noise cancellation but might compromise on comfort. It’s essential to strike a balance based on individual comfort and noise-cancellation needs.
- Compressing the Earplug:
- Hold the foam earplug between the thumb and forefinger, applying gentle pressure to compress it. This action will cause the earplug to become elongated and thinner.
- Compressing the earplug simplifies the subsequent steps, especially when inserting it into the earbud is time.
- Marking the Earplug:
- With the earplug compressed, use a pen to place a small mark in its center. This mark indicates where to cut a hole for the earbud speaker.
- The mark should be clear but not overly large; a tiny dot will suffice.
| Step | Description | Tips |
|---|---|---|
| 1 | Choosing the Right Earplug | Evaluate both size and density. |
| 2 | Compressing the Earplug | Ensure uniform compression for best results. |
| 3 | Marking the Earplug | A clear, small mark is ideal. |
Tips for Success:
- Practice: Before permanently modifying an earplug, practice the compression and marking steps to familiarize yourself with the process.
- Safety: Always work on a clean surface and ensure your hands are clean to maintain the earplugs’ hygiene.
- Patience: Achieving the perfect compression and marking might require a few attempts. Stay patient and persistent for the best results.
Preparing foam earplugs is a foundational step in crafting noise-cancelling earbuds. With the right approach and patience, you’ll be set to enjoy an enhanced listening experience.
2. Cut a Hole in the Earplug
After successfully preparing the foam earplugs, as outlined in the previous section, the next pivotal step is to cut a hole in the earplug.
This hole will accommodate the earbud speaker, ensuring the sound quality remains optimal while achieving the desired noise-cancelling effect.
Let’s break down this process for clarity:
Understanding the Purpose of the Hole:
- The hole in the foam earplug serves as a passage for the earbud speaker. It ensures that the sound from the earbud reaches your ears without any obstruction.
- The size and placement of the hole are crucial. If it’s too large, the noise-cancelling effect might be compromised. If it’s too small, the sound quality could be affected.
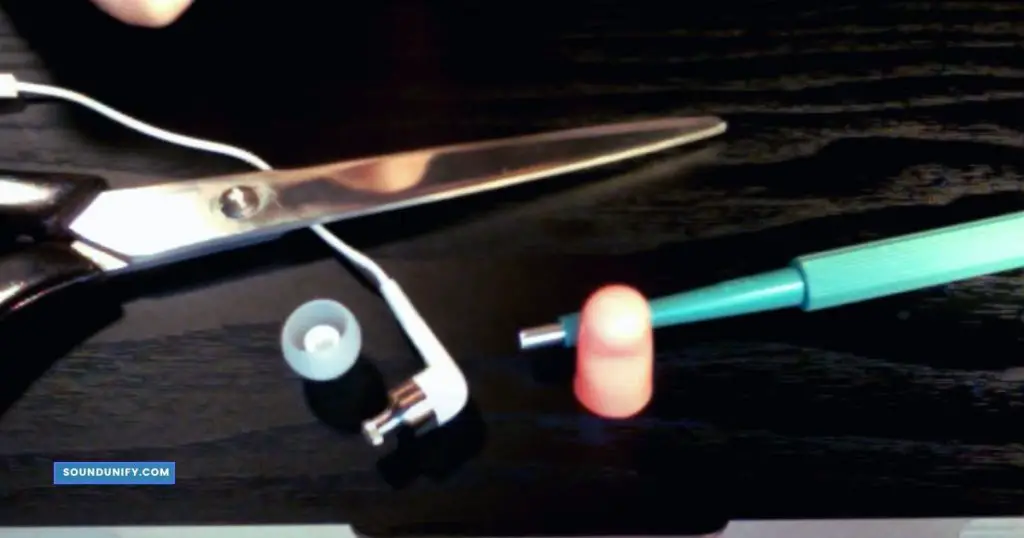
Steps to Cut a Hole in the Earplug:
- Positioning:
- Lay the compressed and marked earplug on a clean, flat surface. Ensure the marked point is clearly visible and facing upwards.
- Your mark in the “Preparing the Foam Earplugs” section will guide you on where to cut.
- Cutting the Hole:
- Carefully start cutting at the marked point using a small knife or a pair of sharp scissors.
- The goal is to create a hole slightly smaller than the diameter of the earbud speaker. This ensures a snug fit and optimal noise-cancelling effect.
| Step | Description | Tips |
|---|---|---|
| 1 | Positioning | Ensure the marked point is easily accessible. |
| 2 | Cutting the Hole | Aim for precision and avoid making the hole too large. |
Tips for Success:
- Steady Hands: When cutting, ensure your hands are steady to achieve a clean and precise hole.
- Safety First: Always be cautious when using sharp objects. Consider placing the earplug on a cutting mat or a piece of cardboard to avoid accidents.
- Adjustments: It’s better to start with a smaller hole and gradually increase its size if needed. This approach prevents accidentally making the hole too large.
To recap, cutting a hole in the foam earplug is a meticulous process that requires precision and patience. You’ll be one step closer to completing your noise-cancelling earbuds by following the steps and tips provided.
The journey began with preparing the foam earplugs, and as you progress, each step brings you closer to achieving the ultimate listening experience.
3. Insert the Earbud
Having prepared the foam earplugs and cut the precise hole, the next step is to insert the earbuds into the foam.
This is a crucial phase, as how the earbud is inserted will determine the effectiveness of the noise-cancelling feature and the overall sound quality.
Let’s guide you through this process:
Understanding the Insertion:
- The earbud needs to be inserted so that the speaker faces outwards. This ensures that the sound is directed into your ears without any hindrance.
- The foam should envelop the earbud snugly, creating a seal that enhances the noise-cancelling effect.
Steps to Insert the Earbud:
- Compress the Earplug: Before inserting, compress the foam earplug again between your fingers, making it elongated and thin. This makes the insertion process smoother.
- Position the Earbud:
- Hold the earbud by its wire or base, ensuring the speaker part is ready to be inserted into the hole.
- Align the speaker with the hole you’ve cut in the foam earplug.
- Gentle Insertion:
- Carefully push the earbud speaker into the hole. Ensure it goes in straight and doesn’t tilt to the sides.
- Once inserted, the foam will expand around the earbud, creating a tight and secure fit.
- Check the Fit:
- The earbud should sit comfortably within the foam, with the speaker exposed and not obstructed by any part of the foam.
- Please gently tug it to ensure it’s securely in place and won’t quickly come out.
| Step | Description | Tips |
|---|---|---|
| 1 | Compress the Earplug | This facilitates easier insertion. |
| 2 | Position the Earbud | Ensure the speaker aligns with the hole. |
| 3 | Gentle Insertion | Apply even pressure for a smooth fit. |
| 4 | Check the Fit | The earbud should be secure and the speaker unobstructed. |
Tips for Success:
- Avoid Force: While it’s essential for the earbud to fit snugly, avoid using excessive force during insertion. This could damage both the earplug and the earbud.
- Adjustments: If the earbud doesn’t fit perfectly the first time, gently remove it, adjust the hole if necessary, and try again.
- Test the Sound: After inserting, playing music is a good idea to ensure optimal sound quality and that the noise-cancelling effect is evident.
Inserting the earbud into the foam earplug is a delicate process that requires patience and precision.
Following the steps outlined will ensure that your DIY noise-cancelling earbuds are effective and provide an enhanced listening experience.
With the earbud securely, you can enjoy your music or podcasts with minimal external distractions.
4. Test the Noise-Cancelling Effect
After inserting the earbud into the foam earplug, it’s essential to test the noise-cancelling effect to ensure your efforts have succeeded.
This step will help you gauge the effectiveness of your DIY noise-cancelling earbuds and make any necessary adjustments. Let’s delve into the testing process:
The Noise-Cancelling Effect:
- The primary goal of noise-cancelling earbuds is to reduce or eliminate external sounds, allowing you to focus solely on the audio being played.
- When correctly fitted with the earbuds, the foam earplugs should create a seal in your ears, blocking out ambient noise.
Steps to Test the Noise-Cancelling Effect:
- Choose a Noisy Environment: To effectively test the noise-cancelling capability, choose an environment with noticeable background noise. This could be a room with a running fan, a busy street, or any place with consistent ambient sound.
- Wear the Earbuds:
- Insert the foam-fitted earbuds into your ears, ensuring they fit snugly and comfortably.
- Ensure the foam expands to fill the ear canal, creating a tight seal.
- Play Audio:
- Start playing music, a podcast, or any audio you choose at a moderate volume.
- Pay attention to the audio’s clarity and whether any background noise seeps in.
- Evaluate the Effect:
- Compare the listening experience with and without the foam-fitted earbuds. There should be a noticeable reduction in external noise with the foam-fitted earbuds.
- Adjust the foam or the position of the earbuds in your ears if you feel the noise-cancelling effect is not optimal.
| Step | Description | Tips |
|---|---|---|
| 1 | Choose a Noisy Environment | A consistent noise source is ideal for testing. |
| 2 | Wear the Earbuds | Ensure a snug fit for best results. |
| 3 | Play Audio | Use varied audio types for comprehensive testing. |
| 4 | Evaluate the Effect | Make adjustments as needed for optimal performance. |
Tips for Success:
- Volume Levels: Start with a moderate volume level when testing. Increasing the volume too much might mask the effectiveness of the noise-cancelling feature.
- Multiple Environments: Test various environments with different noise levels to gauge the earbuds’ effectiveness.
- Feedback: Ask friends or family to try the earbuds and provide input on the noise-cancelling effect. Different ears might have different experiences.
Testing the noise-cancelling effect is a crucial step in creating DIY noise-cancelling earbuds. By ensuring that external noises are effectively blocked out, you can enjoy a superior and immersive audio experience.
Remember, the goal is to achieve clear audio playback with minimal distractions, and with careful testing and adjustments, this is entirely achievable.
FAQs
How do I turn on noise cancelling on my AirPods Pro?
1. Connect your AirPods Pro to your iOS device.
2. Go to the Control Center on your iOS device by swiping down from the top right corner of the screen.
3. Press and hold the volume slider.
4. Tap on the Noise Cancellation button to turn it on.
Can I use foam tips to enhance noise isolation on my earbuds?
What are foam tips for earbuds?
What is the difference between active noise cancelling and passive noise isolation?
How effective are noise-cancelling earbuds?
Do noise-cancelling earbuds work on all noise?
Final Thoughts
Creating your noise-cancelling earbuds is a rewarding experience. It’s a blend of science and art. You start with foam earplugs, carve out a space for the earbuds, and voila!
The result? Enhanced audio, fewer distractions. It’s not just about the music; it’s about reclaiming your auditory space.
A DIY project that pays off every time you hit play. So, why wait? Dive in and let the soundscape envelop you.
James Dimento is a Chief-in-Editor of SoundUnify. He is a headphone enthusiast and creative writer passionate about audio technology. He has three years of experience writing about headphones and sound quality and is responsible for creating reviews and taking care of all administration.