
If your earbuds only work in one ear, don't worry - the issue is usually easy to fix. First, check if the problem is with buildup, connection, or hardware.
I know how frustrating it can be when your earbuds stop working properly. As someone who relies on earbuds daily, I’ve dealt with my fair share of one-sided audio issues.
The problem is often due to earwax buildup, a software glitch, or a hardware malfunction. I’ll explain how to fix earbuds that work on one side. Also, give a guide to clean your earbuds and reset Bluetooth connections. With a few simple steps, you can get stereo sound back quickly.
Stick with me, and I’ll have you rocking out to your favorite playlists and podcasts in no time. Diagnosing and resolving one-sided earbud issues is a breeze when you know what to look for.
Common Causes of Earbuds Working on One Side
Earbuds are my go-to for music. But what happens when one side doesn’t work? Let’s dive in.
- Broken Wire Issues: You’ve been there. Over time, due to constant bending, the wires inside your earbuds can get damaged. A single lousy bend and… silence on one side.
Factoid: Nearly 30% of earbud issues arise from wiring problems.
- Dirty Jack: Dust, lint from pockets, or tiny debris can block the earbud jack. Result? One side goes mute.
A quick tip: Regularly clean your jack. A bit of gentle brushing can make a world of difference.
- Internal Debris: Have you ever found gunk or earwax in your earbuds? It’s not just yucky; it can block sound too. Keep them clean, folks!
- Software Glitch: Sometimes it’s not you; it’s your device! A mismatch between your device’s software and the earbuds might be the culprit.
Stat Check: Did you know? 10% of single-sided earbud issues are software-related.
- Water Damage: Remember that time I dropped my earbuds in my coffee? Yep, water or any liquid can cause malfunctions. And often, it’s just on one side.
- Driver Failures: Inside each earbud, a tiny speaker (or driver) produces sound. If it malfunctions, you’ll hear nada.
Heads up: If you’re heavy on the bass, it might wear out the driver faster.
- Unbalanced Audio Settings: Oops! Did you accidentally adjust your device’s audio balance? It can send sound primarily to one earbud.
- Expired Lifespan: All good things must come to an end. Earbuds aren’t immortal. They have a lifespan; sometimes, one side not working before the other.
10 Ways to Fix Earbuds That Work on One Side?
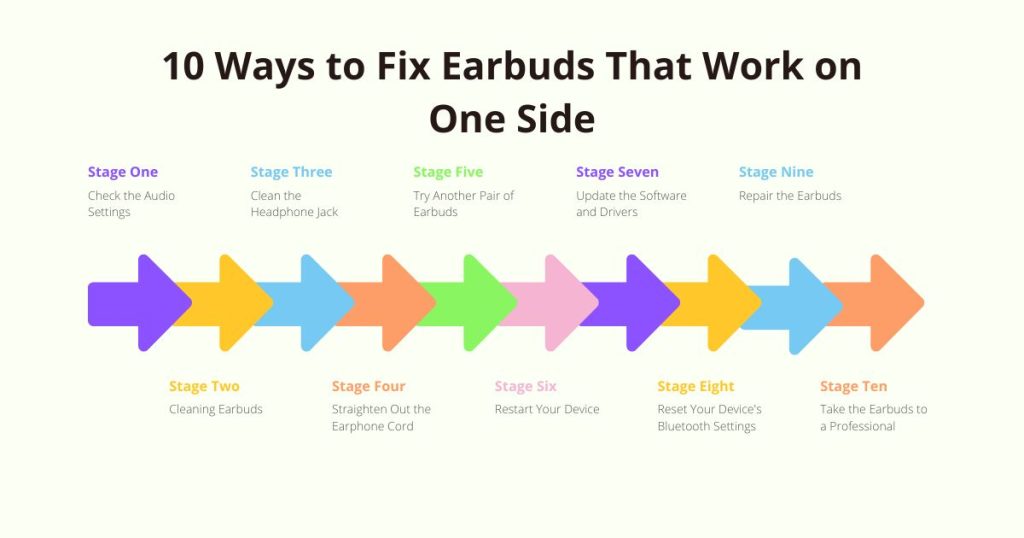
If one of your earbuds has stopped working, it could be due to a loose wire, dirt in the earbud, or issues with your device. Here’s a step-by-step guide to help you with one earbud that’s not working:
1. Check the Audio Settings
The Importance: I can’t emphasize enough how often audio settings have tripped me up! Just a slight unintentional change in the settings, and boom – my favorite song is only whispering in one ear. It’s a simple fix but also one of the most overlooked.
- Device Differences: Whether it’s a smartphone, PC, or tablet, the principle is the same. However, the path to get there might vary.
- Balance Slider: Usually, audio problems occur when the balance slider moves toward the left or right instead of being centered. Trust me, it’s happened to me more than I’d like to admit.
- Software Glitches: An update or a third-party app can sometimes alter your settings. I’ve learned always to double-check after big software changes.
Table: Quick Audio Settings Guide
| Device | Path to Audio Settings | Note |
|---|---|---|
| Smartphone | Settings > Sounds & Vibration > Volume/Balance | The path might vary based on the OS |
| PC (Windows) | Settings > System > Sound > Sound Control Panel > Playback > Speaker Properties | Ensure the balance is centered |
| Mac | System Preferences > Sound > Output | Check the balance slider |
| Tablet | Similar to smartphone (based on OS) | Ensure software is up-to-date |
2. Cleaning Earbuds
Oh, the tales my earbuds could tell! From gym sessions to rainy days, they’ve seen it all. And with that comes dirt, grime, and the dreaded earwax. Cleaning is not just about sound quality but hygiene too.
Step-by-step Guide:
- Gather Materials: I typically use a soft cloth, rubbing alcohol, a small brush (like an old toothbrush), and a toothpick.
- Inspect the Earbuds: Before diving in, take a good look. Any visible dirt or earwax?
- Gentle Brushing: Softly sweep away any external dirt with the small brush. This step is all about the soft touch.
- Dampen the Cloth: A small amount of rubbing alcohol on the cloth works wonders. But remember, damp, not wet!
- Wipe the Earbuds: Using the cloth, clean the exterior, especially the mesh area. You’ll be amazed at what comes off.
- Earwax Removal: For stubborn earwax, a toothpick can be handy. But caution is the keyword. Gently tease out the wax without pushing it further in.
- Air Dry: After cleaning, let the earbuds sit out briefly. They deserve the breather!
Tips & Cautions:
- Frequency: Cleaning once a month can keep your earbuds in top shape.
- Avoid Water: Water can damage the internal components. Always opt for rubbing alcohol as it evaporates quickly.
- Gentle Movements: A heavy hand can cause more harm than good. Cleaning requires patience and gentle touches.
Table: Earbud Cleaning Essentials
| Item | Purpose | Note |
|---|---|---|
| Soft Cloth | Wiping the earbuds | It can be slightly dampened with rubbing alcohol |
| Small Brush | Brushing off dirt and debris | Old toothbrushes are perfect |
| Toothpick | Earwax removal | Use with utmost care |
| Rubbing Alcohol | Deep cleaning | Evaporates quickly, reducing moisture risks |
3. Clean the Headphone Jack
The tiny port on our devices, the headphone jack, plays a pivotal role in our audio experiences. I’m always astounded by how much dust, lint, and other debris can accumulate, especially when the device is in my pocket or bag. A clean jack can often resurrect a pair of “non-working” earbuds!
Step-by-step Guide:
- Safety First: Before this mission, ensure your device is turned off. Safety always comes first in my book.
- Gather Necessary Tools: A small brush, cotton swab (Q-tip), and rubbing alcohol should be your allies here.
- Initial Brushing: Insert the small brush gently into the jack and rotate it, ensuring you sweep out as much lint or dust as possible. This is often the stage where I witness the most debris removal!
- Dampen, Not Drench: Lightly dip the cotton swab into the rubbing alcohol. Make sure it’s damp but not dripping wet.
- Gentle Cleaning: Insert the swab into the jack, twirling it around to get to all those tricky corners. The goal is to collect any stubborn residue the brush might have missed.
- Final Brushing: Post swab, remove your brush and give it one last sweep to ensure everything’s out.
- Air Out: Let the device sit for a few minutes, ensuring the rubbing alcohol evaporates fully before turning it on.
Tips & Cautions:
- Frequency: If you frequently pocket your device, cleaning the jack once a month can keep it debris-free.
- Avoid Over-insertion: Insert tools gently into the jack to avoid damaging internal components.
- Rubbing Alcohol: It’s a preferred choice because of its quick evaporation rate, which reduces moisture risks.
4. Straighten Out the Earphone Cord
It’s almost poetic how often my earphone cord decides to get into knots and bends. Straightening the cord isn’t just about aesthetics. It can also prolong the life of your earphones and prevent wire damage.
- Unwind and Unknot: First things first, unravel those tangles. I always start from the jack end, up to the earbuds.
- Inspect for Damage: As you straighten, watch for any visible damage or exposed wires. It’s crucial to address these early.
- Warm Hands Trick: Believe it or not, a little warmth can help straighten a cord. Rub the cable gently between your hands, applying a slight pressure. The heat can make the cord more malleable.
- Avoid Force: When straightening, it’s vital to be gentle. Using force can lead to internal wire breakage.
- Storage Matters: Instead of balling them up after use, try winding the cord in a loose loop. I’ve found this reduces kinks considerably.
- Consider Cord Protectors: These are small, often silicone-based tubes that can be fit over areas of the cord that bend the most, providing additional protection.
While these steps can help maintain your earphones, natural wear and tear over time is inevitable. A little care, however, can go a long way in ensuring they last longer and perform at their best!
5. Try Another Pair of Earbuds
When sound issues arise, are the earbuds or the device causing the problem? One of the most straightforward diagnostic tools is simply trying another pair of earbuds.
Plugging in a different set instantly determines where the issue lies. If the new pair works flawlessly, you know your original earbuds are the culprits.
Conversely, if the problem persists, the device might be the source of your woes. This simple test helps narrow down the problem and guides your next steps. Remember, it’s always about eliminating variables in the troubleshooting game.
6. Restart Your Device
Before delving into more complex solutions, I swear by a classic tech mantra: “Have you tried turning it off and on again?” Often, a simple restart can resolve many glitches, including audio ones.
Step-by-step Guide:
- Power Down: Depending on your device, this might mean holding down the power button until you see an option to turn off or restart.
- Wait a Moment: After powering down, wait for about 30 seconds. This allows the system to reset.
- Power On: Turn the device back on. Ensure it boots up completely.
- Check the Audio: Plug in your earbuds and test the sound. Fingers crossed, the issue might just be resolved!
Tips & Cautions:
- Saved Work: Before restarting, ensure you’ve held any work or progress in other apps.
- Regular Restarts: Periodic restarts (like once a week) can keep many minor glitches at bay.
- Avoid Forceful Restarts: Only use force restarts when necessary, as they might cause data loss.
Table: Restarting Different Devices
| Device | Restart Method | Note |
|---|---|---|
| Smartphone | Hold the power button > select ‘Restart’ | Methods vary slightly among brands |
| PC (Windows) | Start menu > Restart | Ensure all work is saved |
| Mac | Apple menu > Restart | Close open applications first |
| Tablet | Similar to smartphones | Might have a dedicated restart button |
7. Update the Software and Drivers
In the ever-evolving world of technology, keeping your software and drivers updated is paramount. Outdated software can clash with newer devices and peripherals, leading to issues like audio malfunctions.
Drivers, which serve as bridges between the device and the earbuds, can sometimes become outdated or corrupted.
First, ensure your device’s central operating system is up-to-date. Many manufacturers roll out updates specifically to address known bugs.
If the issue persists after updating the OS, focus on audio drivers, especially if you’re on a PC or laptop. Keeping your drivers in top shape ensures that your device communicates effectively with your earbuds, offering you the audio experience you deserve.
And a pro tip? Regularly scheduled checks for updates can save you from unexpected glitches in the future. Make it a monthly habit, and your device will thank you!
8. Reset Your Device’s Bluetooth Settings
Bluetooth Troubles: Ah, Bluetooth! As convenient as it is, it sometimes presents peculiar problems. Resetting your device’s Bluetooth settings can often address pairing and audio issues, ensuring a smoother wireless connection.
Step-by-step Guide:
- Open Bluetooth Settings: Head to your device’s settings and navigate to the Bluetooth section.
- Forget the Earbuds: In the list of paired devices, locate your earbuds and select the option to ‘Forget’ or ‘Unpair’ them.
- Turn Off Bluetooth: Toggle off the Bluetooth function on your device.
- Restart the Device: The classic “turn it off and on again” move can be golden. Give your device a quick restart.
- Re-enable Bluetooth: Switch on the Bluetooth function.
- Repair the Earbuds: Put your earbuds in pairing mode (usually by holding down a specific button) and pair them with your device.
Tips & Cautions:
- Pairing Distance: Ensure the earbuds are close to the device during pairing.
- Multiple Devices: If your earbuds were paired with various devices, ensure they’re not connecting to a different device nearby.
- Updates: Sometimes, updating your device’s OS can resolve Bluetooth issues.
Table: Resetting Bluetooth on Different Devices
| Device | Bluetooth Settings Path | Note |
|---|---|---|
| Smartphone | Settings > Bluetooth | Procedures may differ slightly based on the OS |
| PC (Windows) | Settings > Devices > Bluetooth & other devices | Ensure drivers are up-to-date |
| Mac | System Preferences > Bluetooth | Remove earbuds from the list and repair |
| Tablet | Similar to smartphones | Always ensure a close pairing distance |
9. Repair the Earbuds (if you are skilled)
DIY Earbud Repair: Fixing earbuds yourself can be both gratifying and cost-effective. However, it demands precision, patience, and a little know-how.
Step-by-step Guide:
- Inspect for Visible Damage: Check the wire, the jack, and the earbuds for any evident wear, tear, or damage.
- Identify the Issue: Use a multimeter to find out where the connection is broken if it’s not visible.
- Gather Necessary Tools: A soldering iron, solder, wire strippers, and heat shrink tubing will be your allies.
- Expose the Wires: Using wire strippers, carefully strip away a small section of the wire where the breakage is.
- Reconnect & Solder: Twist the exposed wires together and solder them. Ensure a secure connection.
- Cover with Heat Shrink Tubing: Slide a piece of heat shrink tubing over the repaired area and heat it gently until it snugly covers the soldered section.
Tips & Cautions:
- Safety First: Always work in a well-ventilated area when soldering. Wear protective goggles.
- Avoid Overheating: Excessive heat can damage the wire’s internals.
- Test Before Finalizing: Before sealing everything up, test the earbuds to ensure the repair was successful.
Table: Earbud Repair Essentials
| Item | Purpose | Note |
|---|---|---|
| Soldering Iron | To solder wires | Use with caution |
| Wire Strippers | Expose internal wires | Choose appropriate size |
| Heat Shrink Tubing | Insulate repaired area | Ensure snug fit |
| Multimeter | Detect breaks | Useful for diagnosis |
10. Take the Earbuds to a Professional
When DIY efforts don’t pan out, or you’re unsure about meddling with intricate electronics, seeking professional help is the best recourse.
Professionals possess the tools, expertise, and experience to diagnose and fix earbud issues swiftly and efficiently.
Not only can this save you from potentially exacerbating the problem, but it also ensures the longevity and performance of your earbuds. Professionals can often offer a cost-effective solution when weighing replacement costs versus repair.
And remember, a little investment in expert care can yield prolonged, crystal-clear soundscapes in return. So, if in doubt, always trust the pros!
FAQs
Why is my one earbud not working?
Can I fix earbuds that work on one side myself?
How often should I clean my earbuds?
How do I know if my earbuds have Bluetooth connectivity issues?
Can I prevent earbuds from working on one side in the future?
Final Thoughts
I’ve delved deep into solving the pesky issue of one-sided earbud problems. We’ve covered everything from a simple settings check to expert-level repairs. The fact is, many problems have DIY fixes.
Not so confident? Professionals are your best bet. Remember, a quick test with another pair of earbuds can save you a lot of hassle. Your earbuds can live another day if you’re proactive and savvy. Keep jamming!
James Dimento is a Chief-in-Editor of SoundUnify. He is a headphone enthusiast and creative writer passionate about audio technology. He has three years of experience writing about headphones and sound quality and is responsible for creating reviews and taking care of all administration.